Category Archives: Development

AJAX – Scottish Developers and the BCS joint meeting

Gary Short will be delivering an AJAX session in Dundee next month.

I you do plan to come along, please register via Scottish Developers (it’s free and only takes a minute):
AJAX – BCS Tayside Joint Seminar

When
Start : Thursday 4 May 2006, 19:00
End : Thursday 4 May 2006, 21:00

Where
Dundee University,
Department of Applied Computing,
The Queen Mother Building

Location Map
Note: The Department of Applied Computing has moved buildings. It is Building 61 on the UNIVERSITY OF DUNDEE campus map.

ABSTRACT
AJAX itself is not a language but a set of technologies used to enhance user experience on the Internet by allowing further information to be gathered from the server, asynchronously, without the page having to be reloaded.

In this demonstration we will examine the history and evolution of AJAX, before taking a look at some popular web sites that make use of AJAX. The demonstration will end with a code example of how to use AJAX to enhance the user experience, and a question and answer session.

Amazon, Google and Flickr are a few of the companies implementing AJAX in their websites, with many others following suit.

The excitement around AJAX ensure this is a must attend session for anyone involved in web design and development.

BIO
Gary Short is a Microsoft Certified Applications Developer, currently employed in the role of software architect at Computa Limited. He has 16 years industry experience in both desktop and web enabled application development. Previously, he has worked for a number of blue chip companies including Amex, IMS Health and Scottish & Southern Energy. He is currently interested in SCRUM, TDD and other Agile methods.

Trivial: Binary To Integer

In response to a web-forum question, I found myself writing a little C# to convert from a string (containing a binary number) into the integer representation of the same. It’s the kind of trivial coding problem that first year programmers would come up against… Of course, we could make it harder by stipulating that we cannot use System.Convert.

I’m sure that there are much better ways of doing this, and I’d be glad to see some of them appear in the comments for this post. There, a kind of challenge…If the quality of the comments is good enough, I might be able to offer a small prize if you are a UK resident. No promises though!

[code lang=”C#”]
public int BinToInt(string binaryNumber)
{
int multiplier = 1;
int converted = 0;

for (int i = binaryNumber.Length – 1; i >= 0; i–)
{
int t = System.Convert.ToInt16(binaryNumber[i].ToString());
converted = converted + (t * multiplier);
multiplier = multiplier * 2;
}
return converted;
}
[/code]

In use:

[code lang=”C#”]
// remember SEFTU, sixteen, eight, four, two, one
listBox1.Items.Add(BinToInt(“00001”).ToString()); // 1
listBox1.Items.Add(BinToInt(“00010”).ToString()); // 2
listBox1.Items.Add(BinToInt(“00011”).ToString()); // 3
listBox1.Items.Add(BinToInt(“00100”).ToString()); // 4
listBox1.Items.Add(BinToInt(“00101”).ToString()); // 5
listBox1.Items.Add(BinToInt(“00111”).ToString()); // 7
listBox1.Items.Add(BinToInt(“01000”).ToString()); // 8
listBox1.Items.Add(BinToInt(“10000”).ToString()); // 16[/code]

It might be of use to somebody…somewhere…

Selectively removing checkboxes in a .NET 1.1 / 2.0 TreeView

Earlier this month, I had the need to customise a TreeView control such that it had checkboxes against some, not all, of the nodes.

Here’s a screenshot of what I wanted:

Treeview

It requires a little bit of code to achieve this effect, but is was worth the effort. Here’s the code that performs the magic:

[code lang=”C#”]
using System.Runtime.InteropServices;

namespace Treeview___CheckBoxes
{
public partial class Form1 : Form
{
public Form1()
{
InitializeComponent();
}

private void Form1_Load(object sender, EventArgs e)
{
// Iterate over the root nodes, removing their checkboxes
for (int n = 0; nTechnorati Tags: , , ,

C# lists: add some elegance to your code

It is a fairly common programming scenario to find ourselves with a list of identical objects. In the past, without adequate support from programming languages, we found ourselves writing a lot of searching and sorting code, and that may have put you off using lists in favour of arrays. All that has changed with C# (particularly 2.0) – its implementation of a list makes handling such lists remarkably easy.

For example, given the following class Person:

[code lang=”C#”]
public class Person
{
public int age;
public string name;

public Person(int age, string name)
{
this.age = age;
this.name = name;
}
}
[/code]

We can create a list of Person objects and add six people like so:

[code lang=”C#”]
Listpeople = new List();

people.Add(new Person(50, “Fred”));
people.Add(new Person(30, “John”));
people.Add(new Person(26, “Andrew”));
people.Add(new Person(24, “Xavier”));
people.Add(new Person(5, “Mark”));
people.Add(new Person(6, “Cameron”));
[/code]

C#’s list mechanism provides us with a number of useful methods. Personally, I find ForEach, FindAll and Sort to be very useful. ForEach allows us access to each item in the list. FindAll allows us to search for objects in the list that match a specific condition. Sort allows us to sort the objects in the list. The following code demonstrates how we might use each of these methods:

[code lang=”C#”]

Console.WriteLine(“Unsorted list”);

people.ForEach(delegate(Person p)
{ Console.WriteLine(String.Format(“{0} {1}”, p.age, p.name)); });

// Find the young
List young = people.FindAll(delegate(Person p) { return p.age < 25; }); Console.WriteLine("Age is less than 25"); young.ForEach(delegate(Person p) { Console.WriteLine(String.Format("{0} {1}", p.age, p.name)); }); // Sort by name Console.WriteLine("Sorted list, by name"); people.Sort(delegate(Person p1, Person p2) { return p1.name.CompareTo(p2.name); }); people.ForEach(delegate(Person p) { Console.WriteLine(String.Format("{0} {1}", p.age, p.name)); }); // Sort by age Console.WriteLine("Sorted list, by age"); people.Sort(delegate(Person p1, Person p2) { return p1.age.CompareTo(p2.age); }); people.ForEach(delegate(Person p) { Console.WriteLine(String.Format("{0} {1}", p.age, p.name)); }); [/code] And here is the output that we should expect: Unsorted list
50 Fred
30 John
26 Andrew
24 Xavier
5 Mark
6 Cameron

Age is less than 25
24 Xavier
5 Mark
6 Cameron

Sorted list, by name
26 Andrew
6 Cameron
50 Fred
30 John
5 Mark
24 Xavier

Sorted list, by age
5 Mark
6 Cameron
24 Xavier
26 Andrew
30 John
50 Fred

Lists are powerful and result in fewer, and more elegant, lines of code. Hopefully this short example has demonstrated their ease and you will find yourself using them in your day-to-day development activities.

DDD3 – Session voting opens

ddd3.gif

I am pleased to announce that you may now vote for those sessions that you would like to see on the DeveloperDeveloperDeveloper 3 agenda!

There’s a great line up of speakers available to choose from – some of whom are travelling from further afield to be here! And it sees the return of some familiar speakers, such as Steve Scott.

I have submitted a session, Unit Testing and Code Coverage: Putting it all together, here’s the abstract:

With Test-Driven Development (TDD) now entering the mainstream via such tools as NUnit and more recently Visual Studio 2005 Team System (VSTS), you may be wondering how to “get more” from TDD. I believe that we can improve the quality of our application by using a combination of TDD and code coverage.

Code coverage, whereby we “track” how much of our code is covered during testing, is not new. Indeed, we can practice code coverage and TDD in isolation. However, applying what we know about code coverage against our unit tests allows us to move our applications to the next “quality” level:
no longer is it acceptable to have unit tests on their own, we must know how well written the unit tests are, how much of the classes under test are really being tested?

Over the course of 60 minutes I will introduce the benefits of code coverage using both manual methods and automated tools. I will briefly introduce TDD and will go on to demonstrate the benefits of using code coverage tools against your unit tests, i.e. how well do your tests exercise your classes/application?

Whilst I will be using Visual Studio 2005 and C#, I will discuss Visual Studio 2003 compatibility too. I will be looking at a handful of the code coverage tools that are available, both free and commercial.

If you would like to see this session, please vote for it! And if there’s anything you would like me to cover in this session, please feel free to send me an e-mail or leave a comment here!

Shutting down a PC using WMI and C#

I found myself needing to re-work some code that was originally part of my WMI presentation from 2003.

After a little bit of re-writing and a little bit of searching, I re-wrote my original Delphi routine, which looked like this:

[code lang=”Pascal”]
[Delphi]
procedure TfrmMain.btnShutdownClick(Sender: TObject);
var
wmiLocator: TSWbemLocator;
wmiServices: ISWbemServices;
wmiObjectSet: ISWbemObjectSet;
wmiObject: ISWbemObject;
Enum: IEnumVariant;
ovVar: OleVariant;
lwValue: LongWord;

begin
wmiLocator := TSWbemLocator.Create(self);
wmiServices := wmiLocator.ConnectServer( edtComputer.Text, ‘root\cimv2’, edtUser.Text, edtPass.Text, ”, ”, 0, nil);

wmiServices.Security_.Privileges.Add(wbemPrivilegeShutdown, True);
wmiObjectSet := wmiServices.ExecQuery(‘SELECT * FROM Win32_OperatingSystem WHERE Primary=True’, ‘WQL’, wbemFlagReturnImmediately, nil);
Enum := (wmiObjectSet._NewEnum) as IEnumVariant;
while (Enum.Next(1, ovVar, lwValue) = S_OK) do begin
wmiObject := IUnknown(ovVar) as SWBemObject;
wmiObject.ExecMethod_(‘Shutdown’, nil, 0, nil);
end;

wmiLocator.Free;
end;
[/code]

…it now looks like this:

[code lang=”C’#”]
[C#]
using System.Management;

public enum ShutDown
{
LogOff = 0,
Shutdown = 1,
Reboot = 2,
ForcedLogOff = 4,
ForcedShutdown = 5,
ForcedReboot = 6,
PowerOff = 8,
ForcedPowerOff = 12
}

ManagementClass W32_OS = new ManagementClass(“Win32_OperatingSystem”);
ManagementBaseObject inParams, outParams;
int result;

W32_OS.Scope.Options.EnablePrivileges = true;
foreach(ManagementObject obj in W32_OS.GetInstances())
{
inParams = obj.GetMethodParameters(“Win32Shutdown”);
inParams[“Flags”] = ForcedShutdown;
inParams[“Reserved”] = 0;

outParams = obj.InvokeMethod(“Win32Shutdown”, inParams, null);
result = Convert.ToInt32(outParams[“returnValue”]);
if (result !=0) throw new Win32Exception(result);
}
[/code]

Here’s a link to more information about this on the MSDN.

[job for tonight – sort out this code format…once and for all]

Excel – wordwrap row autosize issue

I came upon an Excel annoyance last week. I have hit upon it before, but this week, I needed to find a solution.

What’s the problem?
The annoyance is this: merged cells that contain a lot of text do not automatically see their row size grow to fit the amount of test.

The solution is manual: you can resize the row manually, however you cannot double click on the row dividers and let Excel increase the row size to suit the amount of text in the merged cells.

Here’s a little more background to the problem. The screenshot below demonstrates that we can have a single (non-merged) cell word wrap correctly. However it does mean that the entire width of column A is affected, thus the date is pushed to the right.

excel1

The first solution that we might try is to merge a few cells. This works, date is not pushed to the right. However, Excel’s ability to increase the row size to suit the amount of text is lost – double clicking on the row divider does not work and simply results in a single line of visible text, as shown below:

excel4

In order to alleviate this problem, we have to resize the row manually. This is a tedious process and one that does not lend itself to automation, i.e. through programmatic means. Nonetheless, here’s a screenshot of the resized row:

excel2

The solution
The real solution, and it feels like a fudge, but it works very well, is this: use merged cells as before, somewhere to the right of the cell with merged text (e.g. A1), create a copy of the cell’s content (if your text is in cell A1, make cell Z1 “=A1”). Resize the copied cell (Z1) width to match the width (and formatting) of the merged cells (A1). Excel’s row auto-size feature will now work manually and programmatically. Here a screenshot that might help:

excel3

Perhaps this is best explained by use of an example spreadsheet.

Now, the reason why I making such a big thing about this is simple: Excel is great for producing tabular reports. However, to get some formating to work “just right”, it pays to using Excel automation, i.e. work with the format styles programatically. It is for this reason that I find myself writing the following snippet of code:


[C#]
const int cA = 1;
excelWorksheet.Cells[7, cA] = [long string of text];
Excel.Range r = excelWorksheet.get_Range("B7", "B7");
r.EntireRow.AutoFit();

It is the last two lines of code that perform the same function as double clicking on the row divider, thus the row grows to the correct height (albeit of the copied cell, Z1).

Automated Code Coverage and Unit Tests

How well have your tests exercised your code?

Over the course of this posting I plan to demonstrate a number of tools and topics that encompass “testing”. I’ll be looking at code coverage – how much of our code is “exercised” or used. I’ll be looking at tools that can help us with code coverage. I’ll focus on using NUnit for testing and will demonstrate how we can tie it into the code coverage activity. Finally, I’ll be looking how we can integrate all of this good stuff into the Visual Studio IDE…using TestDriven.NET.

With that in mind, I will go through the following:

  1. The creation of a simple class that does something trivial, in this case a calculator (Visual Studio, C#)
  2. The creation of a simple front-end application that uses the calculator (Visual Studio, C#)
  3. An examination of code coverage using the front-end application (NCover and NCoverExplorer)
  4. An examination of code coverage using unit tests (NUnit)

These four topics will demonstrate two things. Firstly, the benefit of using a code coverage tool to help you learn more about your application and the way that it works. Secondly, how that added benefit of a set of unit tests coupled with a code coverage tool can yield increased levels of confidence in your application’s testing strategy. Of course, prior to code coverage tools being automated, the simplest form of code coverage was the debugger: even as recently as 1998 I recall laboriously slaving over the Delphi debugger whilst I was “testing” my application. It was worth the toil, the few additional bugs that came to light meant that the application had years of trouble free use. Now, with code coverage integrated into the IDE, and with unit tests sitting side-by-side with the application source code, the time required to run the tests and perform a code coverage analysis is so short, it can be done with every build.

TestDriven.NET
TestDriven.NET provides an integration layer between a number of testing frameworks, such as NUnit, and the IDE. Before TestDriven.NET, we would write our tests, write some code, build everything and then we would fire up a separate application that would run the tests (e.g. the NUnit front-end). Generally this is/was fine as the benefits of test execution greatly outweighed the use of a secondary application. Whilst the NUnit front-end allows us to choose which tests we want to run (as opposed to running all tests), we still find ourselves leaving the IDE and jumping into another application.

So, in addition to integrating NUnit into the Visual Studio IDE, it also provides integration with NCover and NCoverExplorer.

Code Coverage
For the purposes of this posting, I am going to do and explain things in a slightly “out of order” fashion. I know that I have mentioned test-driven development already, and by rights we should be developing our application in that fashion. However, I would like to introduce code coverage first. Luckily the example that I plan to use is so simple, it could almost be tested without the need for test-driven development. The example that I plan to use to demonstrate code coverage is that of a simple calculator – I could have been more original, I apologise for my banality!

The Calculator Class
Implementing a simple calculator isn’t rocket science, but since I need you to be at least familiar with the code layout, here’s the code that I am using:

test1

Here’s a little front-end WinForms application that makes use of [some] the MyCalculator class.

test3

And here’s the code behind the WinForms application and the “add” button:

test8

So, having compiled CalcApp, we can submit the .exe to NCover. Before we do that, it’s probably useful if I introduce NCover.

What is NCover?
NCover is a command-line tool that scans your application’s code and records information about which lines of code were executed. NCover uses the “sequence points” that the compiler generates and stores in the .pdb file (debug information) to determine which lines of code are executed and how frequently. Without getting bogged down in detail, a sequence point is essentially a single program state or a line of code.

NCover’s command-line syntax is:

Usage: NCover /c [/a ]

/c Command line to launch profiled application.
/a List of assemblies to profile. i.e. "MyAssembly1;MyAssembly2"
/v Enable verbose logging (show instrumented code)

After NCover has analysed your code, it creates two files: coverage.log and coverage.xml.. The .log file contains the events and messages that NCover creates as it analyses your code base. The .xml file is very it all happens: it contains NCover’s analysis of your code base. There is a third file, coverage.xsl. It’s an XSL stylesheet that takes coverage.xml as its input, allowing it to be displayed in a neat tabular fashion inside Internet Explorer.

Running CalcApp through NCover
NCover’s output:

C:\Program Files\NCover>NCOVER.CONSOLE "...\dev\VS2005\Test\DDG\CalcApp\CalcApp\bin\Debug\CalcApp.exe"
NCover.Console v1.5.4 - Code Coverage Analysis for .NET - http://ncover.org
Copyright (c) 2004-2005 Peter Waldschmidt

Command: ...\dev\VS2005\Test\DDG\Calc
App\CalcApp\bin\Debug\CalcApp.exe
Command Args:
Working Directory:
Assemblies:
Coverage Xml: Coverage.Xml
Coverage Log: Coverage.Log

Waiting for profiled application to connect...
******************* Program Output *******************
***************** End Program Output *****************

Alternatively, with TestDriven.NET installed, there is the IDE menu integration:

test7

It’s important to note that the Coverage menu option is context sensitive. Depending upon “where” you right click, say either on the CalcApp solution or the TestLibrary, NCover will be invoked for the item you right clicked on. We will see this difference emerge later on in this posting when we demonstrate the difference between code coverage for CalcApp vs. code coverage for our NUnit tests.

Now, you may recall that I only implemented the “add” calculation. This is deliberate as I need to use the missing calculations to demonstrate code coverage.

Coverage.xml is too large to reprint here and it’s not all that easy to read. Fortunately, NCover’s author realised this and created an XSL (stylesheet) that transforms the XML into something a) more readable and b) more useful. The screenshot below presents a snapshot of that output – notice the green bars and red bars, we’re clearly in the ‘testing’ domain now. The full NCover coverage.xml file can be viewed here.

test10

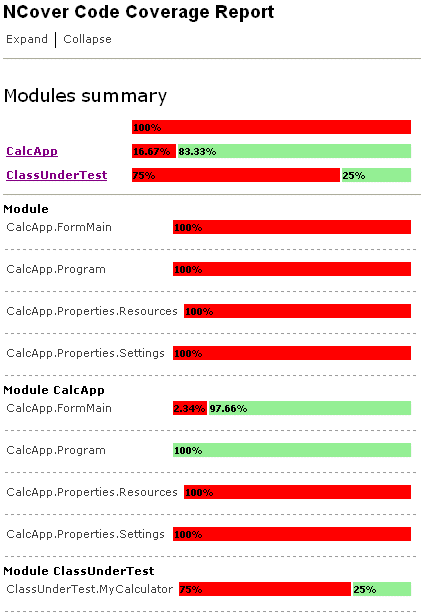
From this report, we can easily see that we’ve only covered 25% of the MyCalculator class. However, and this is a key point, in order to get this far, we had to perform manual testing. We had run the application “through NCover” such that it could watch what was happening. We had to enter the number 38 and 4 and we had to move the mouse and click on the Add button. Whilst this is a better than stepping though code with the debugger, it’s not automated therefore it’s not repeatable.

NCover’s report looks great and it serves a good purpose. NCoverExplorer moves things to the next level, it takes the output from NCover and presents it graphically in a treeview with integrated code viewing:

test4

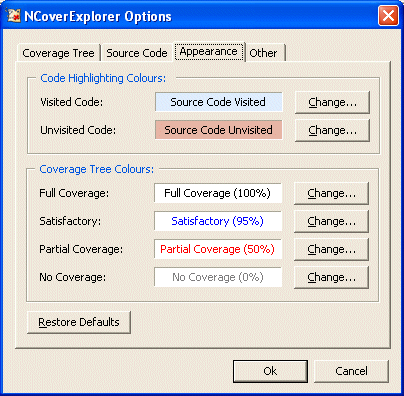
NCoverExplorer uses colour-coding to highlight the status of code coverage. It is configurable as the screenshot below demonstrates:

test9

Introducing unit tests with NUnit
Without going into too much detail about test-driven development and NUnit (further information can be found in the Resources section of this post), our next step is to prepare a new class that allows us to test the MyCalculator class. In reality, we would have written our tests before writing the MyCalculator class, we’re doing things in a slightly different order for the sake of this post.

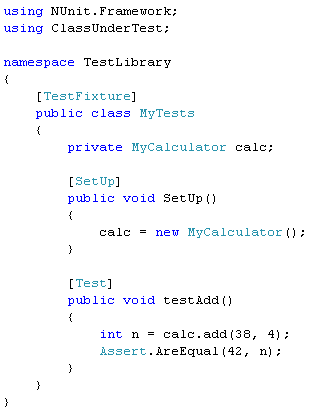
So, using Visual Studio we simply add a new Class Library to our solution, add a reference to the ClassUnderTest namespace and we’re off. The following code demonstrates how we might use the NUnit testing framework to exercise MyCalculator. Whilst not an NUnit requirement, I prefer to name my test methods with the prefix “test”, other unit testing frameworks may vary. As you can see, we’re simply recreating the manual test that we performed using the desktop application and we’re still only testing the “add” method.

test2

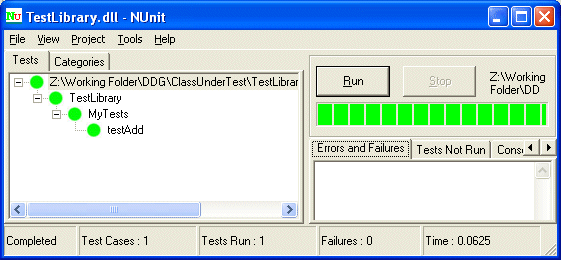
Inviting NUnit to run these tests, in the absence of TestDriven.NET, would mean leaving the IDE. However, with TestDriven.NET, we can right click on the TestLibrary and run the tests using NUnit. The screenshot below presents the output from the NUnit front-end. It clearly demonstrates that the test for addition succeeded and with that we gain the confidence that “everything’s working”. However, what it doesn’t tell us is the fact that we’ve missed out testing some 75% of the MyCalculator class. For that, we need to use NCover on our tests.

test11

Here’s a screenshot of NCoverExplorer viewing NCover’s Coverage.xml after it has analysed the tests:

test5

The key takeaway from this screenshot, and indeed this posting, is the fact that we have automated our test and our code coverage: we can see in a single screenshot how well our tests are exercising our code.

I discovered NCover and NCoverExplorer via a couple of blog posts and was suitably impressed – I am always on the look out for ways of ensuring that my applications are as well tested as they can be. After all, there is nothing worse than a stream of ‘phone calls from your users each complaining about a show stopping crash or feature that does not appear to work. With careful use of the tools mentioned above, we can get ensure that our applications are tested and that we have no code that is unused. Code that is unused is often the source of bugs or feature failures. In the past, without tests and without code coverage tools, we had to resort to using a debugger to test all paths through our code – that was a laborious process fraught with repetition and boredom.

My recommendation: install NCover, install NCoverExplorer, install NUnit, install TestDriven.NET.

Further Reading
TestDriven.NET
TestDriven.NET Google Group
NUnit
MbUnit
Microsoft Team System
Peter Waldschmidt.’s NCover
NCoverExplorer
NCoverExplorer FAQ

DotNet Developers Group articles:
Test-Driven Development: a practical guide, Nov/Dec 2003
Test-Driven Development Using csUnit in C#Builder, Jan/Feb 2004

Using LDAP to locate a user name

I found myself needing to extract the current user’s full name from our Active Directory today. For a variety of reasons, I’ve not done too much work in this area, so I had to hunt around for a few minutes before arriving at a solution.

Firstly, I had to add a reference to System.DirectoryServices to my project – no problem, right click on the References node in Visual Studio and choose Add Reference. Secondly, I had to add using System.DirectoryServices to my source code.

Anyway, here’s the C# code that I used – note the use of the UserName property from the Environment class.

using System.DirectoryServices;
...
DirectoryEntry directoryEntry = new DirectoryEntry("LDAP://dc=DOMAIN_CONTEXT,dc=com");
DirectorySearcher directorySearcher = new DirectorySearcher(directoryEntry);
directorySearcher.Filter = "(&(objectCategory=person)(sAMAccountName=" + Environment.UserName + "))";
DirectoryEntry result = directorySearcher.FindOne().GetDirectoryEntry();

string name = result.Properties["displayName"].Value.ToString();

In my case, the username CMurphy became Craig Murphy (displayName). Your properties may vary, and you’ll need to know your own domain context (dc).

“the source code is the ultimate documentation”

The BBC reports (here too) that Microsoft is to allow access to the source code to selected products. This interesting move will hopefully satisfy the competition commission who are pushing Microsoft to provide more documentation for their products such that vendors can make their own products more compatible. So, rather than provide written textual documentation, Microsoft are saying that their code is their documentation. That’s true enough, gone are the days when developers had to maintain what amounts to two sets of documentation: the code and the written documentation that went with the code. With customers crying out for updates and bug fixes, it’s not difficult to guess which activity is ignored…updating the documentation.

Even comparatively recent, with the divergence of the code and the textual documentation, along came many attempts to integrate the documentation into the code, which is fine, just so long as it’s possible to “hide” the integrated help as it frequently gets in the way during the development process. I have to admit to disliking the bulk of automated documentation that I’ve seen so far: it’s either very much incomplete or there isn’t enough of it – a single line of documentation for a method isn’t really enough. So it’s for this reason that I prefer to treat the code as the best way of gaining an understanding of how something really does work. Remember that documentation goes out of date, folks don’t update it as frequently as they update the source code, the only surefire way of guaranteeing that you’re about to do the right thing, is to look at the source code.

Microsoft’s legal chief, Brad Smith goes as far as saying

the source code is the ultimate documentation…It should have the answer to any questions that remain

However, Neelie Kroes, the competition commissioner disagreed:

“Normally speaking, the source code is not the ultimate documentation of anything…”

“[This is] precisely the reason why programmers are required to provide comprehensive documentation to go along with their source code.”

I’m afraid to say that I disagree with Neelie’s last statement. If I was building a product, whether it is software or hardware, and I was integrating it with a Microsoft product (or any software vendor for that matter), I would be happier with the source code rather than a large textual document. Yes, I would like an architectural overview of the system that I’m looking to integrate with, but that need not be more than a few pages and should be graphical in nature. I know that I’m not alone here: how many times have you been working with a product, following the documentation to the letter only to realise (hours later) that the documentation is factually incorrect? We’ve all been there! Frequently, documentation is created by a separate department, with minimal input from the original programmers. Or, the original programmers write the first draft of the documentation, then “the editors” take over an apply their magic…often changing the meaning or interpretation of something critical on the way!

If programmers are required to provide comprehensive documentation, then project managers/customers should allow the programmers sufficient time to create high quality documentation at the outset, and provide them with time to update it. Sadly, in my experience, documentation is one of the things project managers treat as contingency time, or it’s one of the first things that the customer insists is dropped from the project (“you can easily write the documentation later, can we have this extra feature instead?”)

Jack Reeves first raised this idea way back in 1992 when he published works such as What Is Software Design?, What Is Software Design: 13 Years Later and Letter to the Editor. Click here for more information about these essays.

“the source code is the ultimate documentation”, something not missed by this publication that is at least 16 years old:

agile world

Related posts
The code is the design

Five seconds can save you up to £1m

Computer Weekly reported today that Barclays introduced a five-second cut in their call centres that should save them up to £1m over five years.

I’ve always been a great fan of reducing the amount of time it takes to do something, especially in a commercial environment because time really is money. If I can re-design a form layout such that you (the user) can do something with less mouse movement, or with few keystrokes, then I’ve effectively saved you some time…and thus your employer some money. Of course, tracking this saved time is somewhat difficult and can actually take so long, it negates the time saved. However, if you are able to track it and quantify it, you might be pleasantly surprised.

Design with the customer in mind (or preferably, present in the process!)
I recall writing a time and expense administration application for my employer, circa 1998. The existing paper-based process required us to fill in four sheets of paper in order to record our expenses, mileage, hours, overtime, etc. For a frequent traveller, the time taken to fill in the four sheets of paper could easily amount to 3 or 4 hours, or half a day…each month. You might not think that’s very much, but when you factor in 400+ employees, of whom about 300 will spend 3 hours per month dealing with their time sheet, that amounts to 900 hours or 120 man-days per month.

The application enjoyed lots of “little” time-savers. If you worked for a couple of hours on one project, 15 minutes on another, etc. it would display a hyperlink that automatically setup the hours input form with however many hours (or fractions) were left over. It would track your mileage readings from month-to-month – for some reason our paper-based approach required the vehicle’s mileage at the end of the month and at the beginning of the next month, which are one and the same! For expenses, it would remember the places you went to regularly, remembering the VAT no, what you bought (meals, tickets, etc.) It had a simple “copy for today” option that allowed frequent entries to be duplicated for use in the current day – useful if you found yourself going to the same place on a frequent basis. And it offered a simple Excel export which prove useful when creating client time-sheets or invoices. Lots of little things, tweaked via customer input, and a lot of time was saved.

Despite computerising the existing paper-based process to the letter (that was the specification), the application meant that even the most complicated month could be processed in less than 60 minutes, often a lot less. Of course, these figures are based on observation rather than hard facts, so a pinch of salt is required. That said, the time savings were “of that magnitude” and weren’t something to sneer at. But what did we do with that time saved? Well, one might suggest that the time saved could be spent on billable projects, in which case not only have we saved the time, but now it becomes revenue generating.

The question is: “what do we do with all the time that we save by using IT effectively and efficiently”? I imagine the question is both rhetorical and recursive…in a Dilbert sketch Scott Adams noted that any time saved as a result of IT is simply re-invested. I suppose this is just human nature, nonetheless, application usage scenarios are something that we all should consider when we’re looking at form layouts. And of course, the customer is with us every step of the way. The customer should be the first folks to react to an efficiency gains that you (as designer/developer) have to offer – after all, you are in the enviable position of being an “outsider looking in”, perhaps you can see things that they can’t, you bring to the table the ability to think out of the box.

Related Posts
What’s your most optimal process?
Jon Boxhall posts an amusing tale of a process that is less than optimal (via Mark Wilson).